Unleash Your Inner Easter Bunny with Easy No-Bake Cookie Dough Easter Eggs
Easter is a season synonymous with joy, renewal, and, most importantly, an abundance of sweet treats. While classic chocolate bunnies and jelly beans hold a special place in our hearts, sometimes a new tradition emerges, so utterly delicious it threatens to overshadow all others. Prepare yourselves, because this year, we’re talking about a dessert so dangerously good, so ridiculously easy, it might just revolutionize your holiday spread: chocolate chip cookie dough filled Easter eggs.
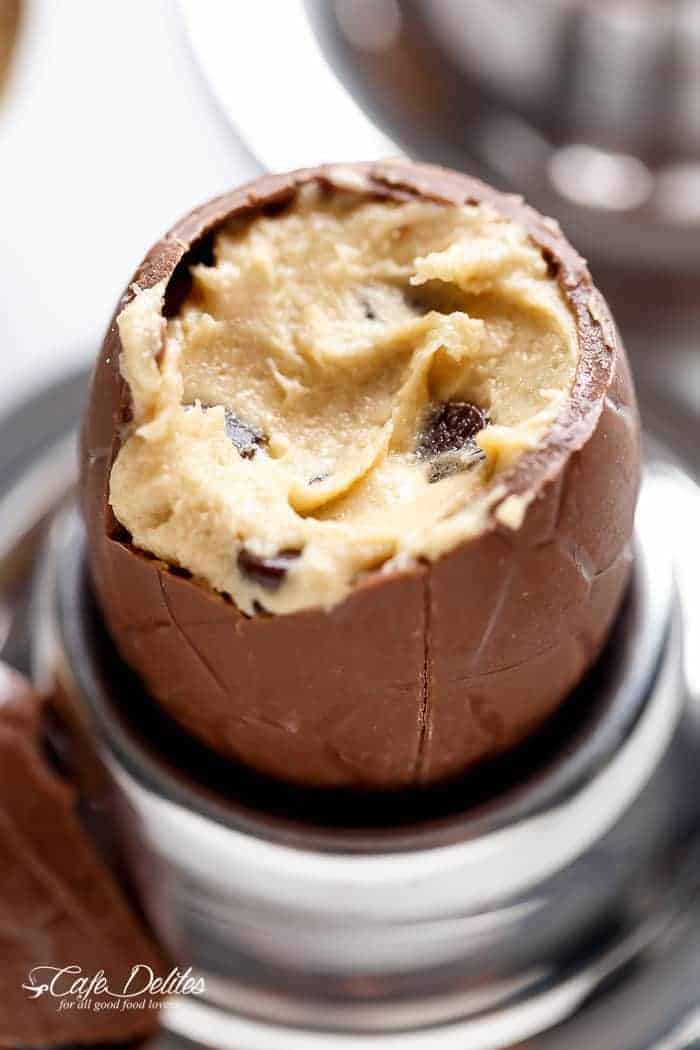
Imagine the delight: a crisp, satisfying snap of chocolate giving way to a rich, creamy, and utterly indulgent center of classic cookie dough. It’s the dream combination for anyone who��s ever been tempted to sneak a spoonful (or ten!) straight from the mixing bowl. What makes these particular treats truly special? They are easy, no-bake, and perhaps most importantly, made with egg-free and heat-treated flour cookie dough, ensuring they are 100% safe to eat for everyone. Forget the oven, ditch the raw egg worries, and get ready for an Easter experience that will have your family literally dancing in the kitchen!
Why These Chocolate Chip Cookie Dough Filled Easter Eggs Are Your New Easter Obsession
The concept of cookie dough is universally beloved, but often comes with a caveat: the risk associated with raw eggs and untreated flour. This recipe elegantly sidesteps those concerns, offering all the joy of eating raw cookie dough without any of the worry. This makes them a perfect treat for kids and adults alike, allowing everyone to indulge guilt-free.
- Safety First: The cookie dough is meticulously crafted without eggs, and the all-purpose flour undergoes a crucial heat-treating step. This eliminates any potential bacteria, making the dough completely safe to consume raw.
- Effortless & No-Bake: Ditch the baking sheets and preheating! These treats come together with minimal fuss, relying on simple mixing and chilling. This makes them an ideal project for busy families or a fantastic last-minute dessert when you need something impressive in a pinch.
- Pantry Power: You likely have most of the ingredients on hand already. We’re talking basic staples that transform into something extraordinary.
- Irresistible Flavor & Texture: The balance is key. A thick, snappy chocolate shell encases a buttery, soft, and slightly chewy cookie dough filling that holds its shape beautifully without being crumbly or greasy. Each bite delivers that perfect harmony of chocolate and cookie dough goodness.
- A Double Treat After Easter: Ever notice how quickly Easter chocolate disappears, especially when little hands are involved? These cookie dough filled Easter eggs are your secret weapon, a delightful backup for when the chocolate stash runs low. You get two incredible textures and flavors in one festive package! For more reasons to dive into this delightful process, learn all about why these treats are becoming a new favorite in our article: Chocolate Chip Cookie Dough Easter Eggs: Your New Favorite Treat.
The Secret Sauce: Mastering the Perfect Cookie Dough Filling
Crafting the ideal filling for these chocolate chip cookie dough filled Easter eggs isn't just about throwing ingredients together; it's about understanding the role each component plays in achieving that dreamy, safe, and stable texture. This isn't just any cookie dough; it's engineered for stuffing!
- Light Butter or Spread (Softened): This is the creamy foundation of your dough. Softened butter provides the rich flavor and smooth consistency essential for a filling that melts in your mouth, not turns greasy. Opting for a lighter butter or spread can also help prevent the dough from becoming overly dense.
- Brown Sugar & Granulated Sweetener: The magic is in the blend! Brown sugar contributes that classic caramel-like depth, chewiness, and crucial moisture that prevents the dough from drying out. Granulated sugar balances the sweetness and helps maintain the dough's structure, ensuring it's not overly sticky or heavy. This combination is vital for a filling that stays soft and scoopable even when chilled.
- All-Purpose Flour (Heat-Treated): This is arguably the most critical safety step. Raw flour can contain harmful bacteria, so heat-treating it is non-negotiable for edible cookie dough.
- How to Heat-Treat Flour: Spread your desired amount of flour evenly on a baking sheet and bake at 300°F (150°C) for 5-7 minutes, or until the internal temperature reaches 160°F (71°C). Alternatively, microwave it in a microwave-safe bowl for 30-second intervals, stirring after each, until it reaches the same temperature. Let it cool completely before using. This step provides the necessary structure for the dough to hold its shape inside the chocolate shell while ensuring safety.
- Milk (Any Variety): A little milk goes a long way in adjusting the dough's consistency. It ensures the dough is smooth, pliable, and perfectly scoopable, allowing you to achieve that creamy, luscious texture without being too dry or crumbly.
- Vanilla Extract & Salt: These are your flavor enhancers. Vanilla brings warmth and depth, complementing the chocolate and butter, while a pinch of salt sharpens all the sweet notes, preventing the dough from tasting flat.
- Mini Chocolate Chips: The stars of the show! Mini chips are ideal for this application as they distribute evenly throughout the dough and don't create awkward bulges when filling the hollow eggs.
For a deeper dive into crafting the perfect egg-free, perfectly smooth filling, check out our guide: Homemade Cookie Dough Easter Eggs: Egg-Free & Perfectly Smooth.
Step-by-Step Guide to Crafting Your Safe & Simple Cookie Dough Easter Eggs
Ready to transform simple ingredients into holiday masterpieces? Here’s how to assemble your irresistible chocolate chip cookie dough filled Easter eggs:
- Prepare Your Flour: Start by heat-treating your all-purpose flour as described above. Allow it to cool completely before proceeding. This step is crucial for safety!
- Cream the Wet Ingredients: In a medium-sized mixing bowl, combine the softened light butter (or spread) with both the brown sugar and granulated sweetener. Using an electric mixer (or a sturdy whisk and some elbow grease), beat until the mixture is light, fluffy, and creamy – about 2-3 minutes. Stir in the vanilla extract.
- Combine Dry & Wet: Add the cooled, heat-treated flour and salt to the creamy butter mixture. Mix on low speed, or stir by hand, until just combined. The mixture will be a bit crumbly at this stage.
- Achieve Perfect Consistency: Gradually add the milk, one tablespoon at a time, mixing after each addition. Continue until the dough comes together into a smooth, soft, and pliable ball. It should be creamy but firm enough to hold its shape. Avoid overmixing once the milk is added.
- Fold in the Chips: Gently fold in the mini chocolate chips until they are evenly distributed throughout the dough.
- Prepare Your Chocolate Shells: Carefully unwrap your hollow chocolate Easter eggs. Using a sharp, non-serrated knife, gently saw off the top portion of one half of each egg. The key is slow, steady pressure. A slightly warmed knife can help achieve a cleaner cut. You’ll only need one half per finished egg, or if you prefer a complete egg, you can reseal them later.
- Fill with Delight: Using a ½ teaspoon measuring spoon, scoop small amounts of cookie dough and gently press it into each chocolate egg half. Fill the eggs level with the rim, smoothing the top with the back of the spoon or your finger. Make sure the dough is snugly packed but don't overstuff to avoid cracking the chocolate.
- Chill to Perfection: Place the filled Easter egg halves on a plate or baking sheet lined with parchment paper. Refrigerate for at least 30 minutes (or freeze for 15 minutes) to allow the cookie dough to firm up and the chocolate to set firmly around it.
Tips for Presentation, Storage, and Variations
Making these chocolate chip cookie dough filled Easter eggs is a joy, and presenting them is half the fun! Here are some extra insights to elevate your experience:
- Storage: Store your finished cookie dough Easter eggs in an airtight container in the refrigerator for up to a week. While they are safe at room temperature for a short period, chilling keeps the cookie dough firm and the chocolate from melting.
- Resealing Option: If you want to create full, re-sealed Easter eggs, gently warm the edges of two filled halves with a warm knife or by quickly pressing them against a warm plate, then press them together. The melted chocolate will act as a "glue."
- Drizzle & Decorate: For an extra touch of elegance, melt some additional chocolate (white, dark, or milk) and drizzle it over the finished eggs. Add sprinkles before the drizzle sets for a festive pop of color.
- Flavor Variations: Don’t be afraid to experiment! Try different extracts like peppermint, almond, or orange. Swap out chocolate chips for white chocolate chips, butterscotch chips, or even mini M&M’s.
- Gifting: These make incredible homemade gifts! Arrange them in a decorative box with some tissue paper for a truly thoughtful Easter present.
- Troubleshooting: If your cookie dough seems too dry, add milk half a teaspoon at a time until pliable. If it's too sticky, add a tiny bit more heat-treated flour.
Conclusion
These Easy No-Bake Cookie Dough Easter Eggs are more than just a dessert; they’re an experience. They embody the spirit of Easter with their festive appearance, while delivering an undeniably indulgent flavor that appeals to all ages. From their effortless preparation to their guaranteed safe-to-eat status, these chocolate chip cookie dough filled Easter eggs are set to become your family’s most requested holiday treat. So, gather your simple ingredients, embrace the joy of no-bake, and prepare to delight everyone with a new Easter tradition that's as safe and simple as it is spectacularly delicious!
